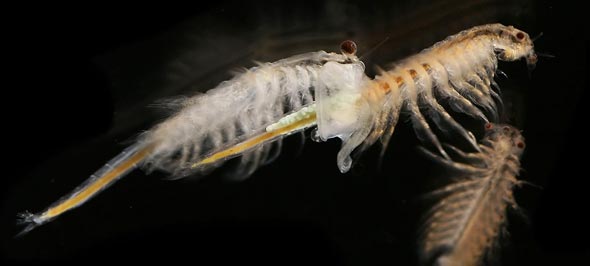
Brine shrimp, as they are commonly known, are small salt-water dwelling crustaceans of the genus Artemia, typically living in saline lakes all around the world, though the most widely seen varieties available to aquarists come from Utah and San Francisco, USA. Adult shrimp are regularly seen for sale in fish stores both alive and frozen, and if you are not a fish breeder these will probably be the only brine shrimps you will experience. If, however, you decide to raise some fry, there is no better food than newly hatched Artemia larvae - bar none. These are actually a very interesting animal, and as eggs (correctly called cysts) they have the ability to survive the most extreme environmental conditions; dessication, freezing - and can remain viable for decades under certain conditions. They are inexpensive, nutritious (particularly when freshly hatched), disease-free and greatly enjoyed. But best of all, they are reliable; you can plan a hatch for as many as you need at precisely the time you need them.
The adult shrimp is a slow moving creature and one easily caught by all fish. Around 1 cm in length, they are a good mouthful for most commonly kept species, and although they live in environments too saline for the majority of fish (they do not live together in the wild), they are a good approximation for the kind of invertebrates that make up the diet of most fresh water species. Be sure to rinse shrimps well with fresh water before feeding, in order not to introduce unwanted salt into the aquarium. Feeding live foods naturally satisfies the instinct to hunt - but do not overfeed - the lifespan of adult Artemia in the freshwater aquarium is only a few hours.
Adult Artemia are high in roughage, but unless recently-fed offer little in the way of other nutrients. Living shrimp purchased in stores may be hungry themselves, and it is a good idea to keep them in some algae rich green water in order to gut-load before feeding to fish. Adult shrimp are filter feeders, taking their food from the water column in which they live. They may also be enriched with Spirulina or astaxanthin (especially good for improving red colouration in fish). Shrimps that have fed well on algae retain a green hue themselves, and certainly have a greater nutritional profile than individuals that are half-starved.
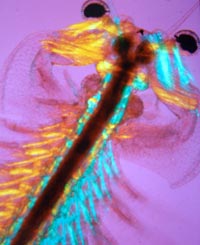
When the baby brine shrimp (larvae, or nauplii) first emerge from their shells, they are equipped with a yoke sack on which they feed for their first few hours. At this stage they offer the best nutrition for young fish. As they age, they grow larger and absorb these nutrients - it is essential that they are fed to fry as quickly as possible. Some strains of shrimp are smaller than others, with the San Francisco strain being the smallest widely available. Of course, some very small fry will be too small to even eat these, but even the tiniest species, after a few days or feeding on paramoecium will be able to take newly hatched nauplii; of course, these should be fed as soon as possible after hatching, in order that they are as small as possible, and that they offer the best possible nutrition.
When raising a batch of fry it is important that all individuals are well fed. This will allow the fish to grow larger, more colourful and, perhaps most importantly reduce predation. If a few large males eat their smaller siblings (perhaps mostly females) skewed sex ratios can arise, threatening future breeding attempts. The ideal way to raise a batch of fry is to keep them alone, in a small plain tank, with gentle filtration (most likely a small sponge filter). The fry should be kept in a continual cloud of Artemia nauplii - more than they can possibly eat. All fry will be well fed (evident by their pink bulging bellies), and predation of smaller fry will be eliminated. The excess shrimp will ultimately die, so it is essential to have an apple snail or two in the tank. As the tank is plain bottomed (no gravel or sand) the snails will quickly hoover up dead (and some living) shrimp, before they can pollute the water.
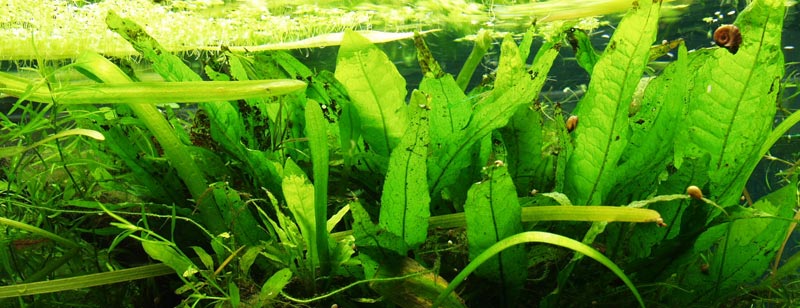
Young Artemia nauplii, although merely a snack for even the smallest adult fish, can be an excellent meal. Fish clearly love them, and although it might take some time to take their fill, they eat with gusto. But for many livebearing and egg scattering species, a regular feeding of baby brine shrimp in a well planted tank will allow some fry to reach maturity without any extra attention from the aquarist. Fry will hide out amongst plants, and feed on shrimp and infusoria; some will make it to adulthood if they can grow quick enough, and avoid being eaten by larger tankmates. The more regular the shrimp feeding, and the more hiding places, the more fry will survive. Although there will never be huge numbers, fry bred this way tend to be the quickest, healthiest and best adapted to tank life. In a planted tank, some care must be made to avoid over-feeding, if there are no bottom feeders to clear up - more about the long term breeding method here.
Hatching Brine Shrimp takes a little getting used to. It is not difficult per se but things can go wrong. Cysts must be stored correctly in order to keep good hatch rates, and naturally require the correct salinity, and strong aeration to allow the larvae to emerge. Good quality eggs can have very high hatch rates, whilst cheaper ones may have comparatively low rates. It is worth paying for good quality eggs. Low hatch rate eggs are suitable for decapsulation, however (see below).
As mentioned above, Artemia cysts can remain viable for decades if stored correctly. They are in a state of diapause; development has slowed, almost to a halt. Ideally keep them cool and dry; refrigerated in an air-tight container. Failure to do this will result in reduced hatch rates.
It is possible to buy off-the-shelf salt/cyst mix - and this is certainly the easiest method to get some Artemia in small quantities. If you are serious, it is better (more economical) to make up your own salt mix (3 parts NaCl to 1 part Epsom salt, MgSO4) or use commercially available sea salt at 25-30 grams/litre.
The simplest method to hatch a few shrimp is to put a very small number of cysts into a shallow container of hatching solution with a large surface area. Shrimps need high oxygen levels to emerge; as this method requires oxygen to be absorbed at the water's surface only, it will only work when tiny amounts of shrimp are required - perhaps a few hundred cysts (a very, very, small pinch) in a petri dish, preferably lidded to avoid evapouration.
For larger volumes, commercially available hatcheries are probably the easiest way to get started, but it is quite easy to make your own hatchery out of a plastic water bottle, or similar. The key thing is to have a container which can be continually aerated without any 'dead' spots; the cysts should be kept moving about the water column. Sometimes, especially in the first few hours, they will get stuck to the sides of the container, above the water line, but with a little swirling of the container can be washed down again. Good light is essential throughout the hatch - typically a desklamp above or next to the hatchery will suffice.
Home-made DIY shrimp hatcheries are very simple to make. Serious fish breeders typically have several running at once on rotation. They are very simple, easy to maintain, and effectively costless to produce.
The easiest way to make a brine shrimp hatchery is as follows.
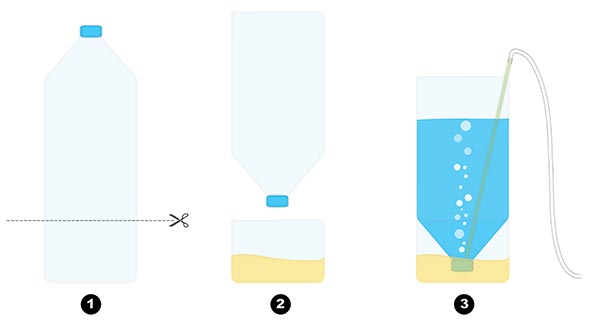
(1) Take a large (preferably 2 litre) lidded water or fizzy drink bottle; ideally one with smooth sides. Cut the bottle in two about a third to three quarters of the way up from the bottom (depending on the taper of the bottle).
(2) Half fill the bottom portion with sand or gravel to weigh it down (otherwise the hatchery is top-heavy, and prone to tipping over), and invert the (lidded) top portion. This is where the cysts and hatching mix go.
(3) Add a rigid airline for aeration that extends (very important!) right to the bottom of the bottle, so no cysts get to rest on the bottom. You may need to clip it in place or use lead plant weights. Add a gang valve to control airflow; it needs to be strong enough to keep all cysts suspended, but not so strong as to allow it to bubble over.
And that's it. Add shrimp cysts, and after around 24 hours (temperature dependent) the baby shrimp will be hatching. Note, some eggs will get pushed above the water line, but a little swirling (especially in the first few hours) will wash these back into the main body of hatching water.
To collect, simply turn of aeration and place a lamp near the water's surface. Within a few minutes, the shrimp will gather around the light where they can easily be syphoned off. Further shrimp will hatch over the next day or two, so keep the hatching mix aerated, and collect more shrimp every few hours. The shrimp should be sieved in a very fine net/sieve - brine shrimp sieves are commercially available, but are also easy to make if you have some fine enough netting material. Before feeding to fish, the shrimp should be well rinsed with fresh water to avoid adding adding unwanted salinity to the fry tanks.
The hatching water can be reused 2-3 times, although some evaporation will occur, so it may need topping up with fresh water to keep the salinity at the required level.
Old, used hatching water will be full of nutrients - if left lidded in sunlight will quickly develop algal growths - the few shrimps invariably left will grow into adults, generally not in huge numbers without aeration, but perfect for feeding to adult fish.
Sometimes, especially when hatch rates start to fall, or with a low quality batch of eggs, decapsulation - or the removal of the hard outer shell - can be very useful. It can improve hatching rates, and in fact decapsulated Artemia cysts can even be fed directly to fish. The process is simple, though perhaps a little messy - they are simply soaked in a bleach solution to dissolve the tough outer shell. The decapsulated eggs obviously do not move, and therefore do not stimulate the same hunting response as living moving shrimp, but they are still nutritious - perhaps better for smaller adult or sub-adult fish rather than newly hatched fry. Another advantage is that the empty shells are removed from the whole hatching process, somewhat reducing the messiness of the brine shrimp hatching process. The technique for decapsulation is as follows...
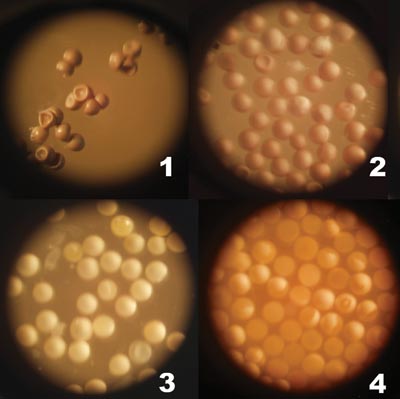
The dry eggs (1) must first be hydrated - normal tapwater is fine - the saline hatching solution is not needed at this stage. In around ten minutes or so, the dimpled dry eggs, swell and become fully rounded (2).
Normal household bleach, Sodium hyperchlorite (but without any added fragrance etc) will work fine for the decapsulation. It is difficult to be precise about concentrations, volumes, and times, as different bleaches, and different eggs respond slightly differently - but typically decapsulation will take between five and fifteen minutes, but sometimes up to an hour. Add a spoon of shrimp eggs to a jar of bleach and aerate. The key is to watch for changes in colouration. Initially the cysts will turn a pale white colour (3), before turning pink (4).
At this stage they are ready to use. Bleach is naturally very dangerous to fish, so decapsulation should really be performed away from tanks. The decapsulated shrimps should then be sieved and rinsed thoroughly. Use of some aquarium dechlorinator to neutralise the bleach is advisable to avoid any chance of bleach getting into fish tanks.
The rinsed decapsulated eggs may then be added to hatching solution, for a good clean hatch of shrimp; stored in the refrigerator for a few days; or fed directly to fish. Care must be taken, however, in feeding decapsulated eggs, as they can get trapped amongst gravel, remain uneaten, and foul water. Again, best fed to fish in a plain bottomed tank.
Great first fish! Livebearers are unlike other fish in that they do not lay eggs; the young develop inside the mother and when born are significantly larger than the offspring of similarly sized egglayers. Species such as the guppy, platy and swordtail are incredibly prolific and are some of the best known, and most colouful aquarium species
Have a look at some of these related sites